| 일 | 월 | 화 | 수 | 목 | 금 | 토 |
|---|---|---|---|---|---|---|
| 1 | 2 | 3 | 4 | 5 | 6 | 7 |
| 8 | 9 | 10 | 11 | 12 | 13 | 14 |
| 15 | 16 | 17 | 18 | 19 | 20 | 21 |
| 22 | 23 | 24 | 25 | 26 | 27 | 28 |
Tags
- 독립기념관
- 네트워크 프로그래밍
- 언제나 휴일
- 안드로이드 앱 개발
- C++
- 실습
- 충남 천안
- 원격 제어 프로그램
- 유튜브 동영상 강의
- 표준 입출력
- 표준 라이브러리 함수
- 무료 동영상 강의
- 캡슐화
- 졸업 작품 소재
- 동영상
- 언제나휴일
- c언어
- 알고리즘
- Windows Forms
- 산책하기 좋은 곳
- 프로젝트
- 파이썬
- 소스 코드
- 실습으로 다지는 c#
- 강의
- 동영상 강의
- 추천
- c#
- 클래스 다이어그램
- 소켓 통신
Archives
- Today
- Total
프로그래밍 언어 및 기술 [언제나휴일]
4. 기본 컨트롤 – 1. TextView 본문
이번에는 기본 컨트롤(위젯) 중에서 텍스트 형태로 정보를 보여주는 TextView 실습을 해 봅시다.

실습의 편의를 위해 최상위 요소는 LinearLayout으로 배치하세요.
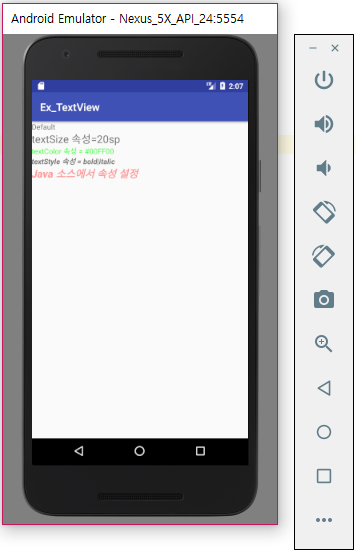
그리고 5개의 TextView를 자식으로 배치합시다.
text 속성은 화면에 표시할 내용입니다. textSize, textStyle 등의 속성을 제공하고 있습니다.
만약 java 소스 코드에서 접근하고자 한다면 id 속성을 “@+id/[원하는 이름]”형태로 지정하세요.
<?xml version="1.0" encoding="utf-8"?>
<LinearLayout xmlns:android="http://schemas.android.com/apk/res/android"
    xmlns:app="http://schemas.android.com/apk/res-auto"
    xmlns:tools="http://schemas.android.com/tools"
    android:layout_width="match_parent"
    android:layout_height="match_parent"
    tools:context="com.example.ehclub.ex_textview.MainActivity"
    android:orientation="vertical">

    <TextView
        android:layout_width="match_parent"
        android:layout_height="wrap_content"
        android:text="Default"/>
    <TextView
        android:layout_width="match_parent"
        android:layout_height="wrap_content"
        android:textSize="20sp"
        android:text="textSize 속성=20sp"/>
    <TextView
        android:layout_width="match_parent"
        android:layout_height="wrap_content"
        android:textColor="#00FF00"
        android:text="textColor 속성 = #00FF00"/>
    <TextView
        android:layout_width="match_parent"
        android:layout_height="wrap_content"
        android:textStyle="bold|italic"
        android:text="textStyle 속성 = bold|italic"/>
    <TextView
        android:layout_width="match_parent"
        android:layout_height="wrap_content"
        android:id="@+id/txtview"/>

</LinearLayout>
MainActivity.java 소스 파일의 onCreate 메서드에서 activity_main.xml에 배치한 5번째 TextView를 멤버 필드에 참조한 후에 속성을 지정해 봅시다.
먼저, findViewById 메서드를 이용하여 xml 파일에 배치한 요소를 참조할 수 있습니다. 이 때 R.id.[설정한 이름]을 입력 인자로 전달하고 참조할 형식으로 명시적 캐스팅을 수행합니다. (현재 TextView를 사용하기 위해 필요한 import문이 없는 상태입니다. TextView에 이동한 후에 Alt+Enter를 입력하여 import를 선택하세요.)
TextView tv = (TextView)findViewById(R.id.txtview);Java 소스에서 TextView 의 text 속성을 지정할 때는 setText 메서드를 사용합니다.
글자 크기는 setTextSize 메서드를 사용합니다. 글자 색은 setTextColor 메서드를 사용합니다. Bold나 Italic 등을 지정하려면 setTypeface 메서드를 이용합니다.
다음은 MainActivity.java 소스 파일의 내용입니다.
package com.example.ehclub.ex_textview;

import android.graphics.Color;
import android.graphics.Typeface;
import android.support.v7.app.AppCompatActivity;
import android.os.Bundle;
import android.util.TypedValue;
import android.widget.TextView;

public class MainActivity extends AppCompatActivity {

    TextView tv;
    @Override
    protected void onCreate(Bundle savedInstanceState) {
        super.onCreate(savedInstanceState);
        setContentView(R.layout.activity_main);
        tv = (TextView)findViewById(R.id.txtview);
        tv.setText("Java 소스에서 속성 설정");
        tv.setTextSize(TypedValue.COMPLEX_UNIT_SP,20);
        tv.setTextColor(Color.argb(100,255,0,0));
        tv.setTypeface(null, Typeface.BOLD_ITALIC);
    }
}
언제나휴일 추천 여행 및 산책
'Java 안드로이드 > 안드로이드' 카테고리의 다른 글
| 4. 기본 컨트롤 – 5. RadioButton (0) | 2025.01.04 |
|---|---|
| 4. 기본 컨트롤 – 4. CheckBox (0) | 2025.01.04 |
| 4. 기본 컨트롤 – 3. Button (0) | 2025.01.04 |
| 4. 기본 컨트롤 – 2. EditText (0) | 2025.01.04 |
| 3. Layout – 4. GridLayout (0) | 2025.01.04 |
| 3. Layout – 3. TableLayout (0) | 2025.01.04 |
| 3. Layout – 2. RelativeLayout (0) | 2025.01.04 |
| 3. Layout – 1. LinearLayout (0) | 2025.01.04 |


